Colonial Wars |
American Wars |
Link To This Page — Contact Us —
The Battle of Saratoga (Second)/Bemis Height's
October 7, 1777 in Saratoga, New York
 |
|||||||||||||||
|
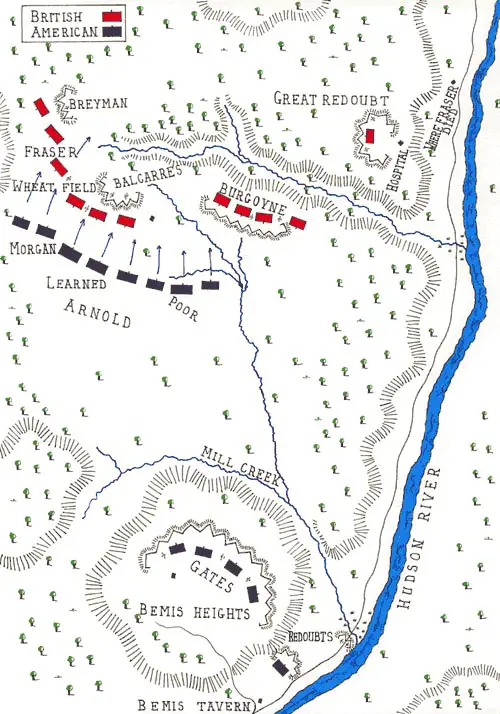
After the Battle of Saratoga (First)/ Freeman's Farm, Maj. Gen. John Burgoyne strengthened his defensive lines in positions extending from Freeman's Farm in the west to the Hudson River in the east. To his south, the American force, commanded by Maj. Gen. Horatio Gates, were at the fortifications atop Bemis Heights. Gates used this same time to strengthen his defensive lines against an anticipated British attack. Also, additional reinforcements were arriving during this same time. Gates kept his force inside their entrenchments along the high ground just west of the Hudson River. About 3,000 troops and most of his artillery occupied positions overlooking the river. On the north-northwestern position of the line was Brig. Gen. Benjamin Lincoln's 3,800-man division. Lincoln had another 1,200 New York militia, commanded by Brig. Gen. Abraham T. Broeck, behind him available for immediate support. This area was built around the critical piece of terrain known as Nielson's farm. If the British captured this area, their artillery could force the Americans to flee Bemis Heights.
On the American left (west) were 600 light infantrymen, commanded by Cols. Daniel Morgan and Henry Dearborn.
Burgoyne received word that the Americans had captured one of his supply flotillas on Lake George. He was tempted to abandon the whole enterprise and withdraw to Fort Ticonderoga, but information that Maj. Gen. Henry Clinton was advancing to meet him up the Hudson River from New York caused him to remain in his camp. In spite of considerable success in the southern reaches, Clinton had not make any real progress up the Hudson River and would eventually abandon the idea of joining forces. Unfortunatley for Burgoyne, he would never receive the change of plans.
While Burgoyne was waiting for the promised reinforcements from Clinton, the total number of British forces at Freeman's Farm had dwindled to 5,000 effectives. Burgoyne had waited for nearly 3 weeks for Clinton to arrive. Being short on supplies and constantly losing men to illness and desertions, Burgoyne felt compelled to wait no longer and to take the offensive against the Americans at Bemis Heights.
On October 4, Burgoyne held a council-of-war with his senior generals. At the time, Brig. Gen. Friedrich von Riedsel suggested a general retreat, but Burgoyne decided on a reconnaissance-in-force. This move was designed to push south by southwest and probe the American defenses. His senior generals disagreed with the plan, but Burgoyne knew that he had to make a move, break through the American lines, either defeat or scatter the Americans, and finally to move south to Albany.
Click to Enlarge
On October 7, Burgoyne determined to launch the delayed attack on the American positions on Bemis Heights.
He initiated this plan with an advance divided into 3 columns and 10 guns, commanded by Brig. Gen. Simon Fraser: Maj. Lord Balcarres commanded light infantry on the right column, von Riedsel's Hessians and Brunswick infantry in the center column, and British grenadiers commanded by Maj. John Dyke Acland on the left column. Maj. ?? Fraser's rangers and 600 Tories and Indians would lead the main force in a wide arc to the west and south. (They would wind up marching too far west and not play a major role in the battle). Burgoyne decided to manuever his columns depending on how the Americans were deployed and how Gates reacted to this movement.
Fraser led his 3 columns out of the entrenchments and advanced about 3/4 mile to the edge of Barber's wheatfield, where they deployed. The American pickets sent word to Gates that the British had advanced and were forming up in the wheatfield. Gates ordered Lincoln's division to move forward and meet the British.
The battle bagan when Acland's artillery and grenadiers on the British left spotted Brig. Gen. Enoch Poor's 800-man brigade in the woods below them and opened fire. Poor's men had formed at the base of a slight elevation. Firing downhill, the artillery fire flew over the heads of Poor's troops. Acland then ordered a bayonet charge, but before they could get started, Poor's men fired a deadly volley at them and launched their own attack. Acland's men were cut to pieces, with Acland being shot in both legs and being captured. At the same time that Poor and Acland were fighting each other, Morgan and Dearborn advanced through the woods and attacked Balcarre's column's flank and rear. One of Burgoyne's couriers was sent to Balcarre with an order to retreat but was killed. Balcarre never received the order to fall back. Balcarre's command quickly collapsed and fled to the rear. Both of the British flanks gave way, exposing Riedesel's column to the advance of Brig. Gen. Ebenezer Learned's brigade.
Hearing the sounds of battle, Arnold rode onto the battlefield just as Learned's brigade began its assault. Arnold took over command and led the men in their assault. Riedelsel's flanks were exposed and eventually had to fall back. Fraser tried to rally his men and form a second line of defense. At a critical moment in the battle, Timothy Murphy (one of Morgan's sharpshooters) was ordered to shoot and kill Fraser. Murphy's first two shots missed but his third shot found its target, mortally wounding Fraser. The pressure from both sides and the front forced the British and Hessian troops to move back to the rear at Freeman's Farm. At Freeman's Farm, they reorganized at two entrenchments known as Balcarre's Redoubt and Breymann's Redoubt, and two fortified cabins in between. The fight near Mill's Creek had lasted about 1 hour. Arnold realized that an opportunity now existed to follow up the British defeat with a decisive battlefield victory.
The second part of the battle began with Arnold leading his troops to the British breastworks. At Balcarres' Redoubt, the Americans made their way through the abatis but was driven back. At this time, Learned's brigade arrived on the scene and Arnold them to clear the reinforced cabins between the redoubts. This exposed the southern (left) flank of Breymann's Redoubt. They soon worked their way around the British flanks and took the fort from the rear. Next, they headed to Breymann's Redoubt.
As Arnold was organizing an assault, he was shot in the leg. The Hessians held out as long as they could. The redoubt was not built to withstand repeated and overpowering assaults from several directions. The Hessians was finally forced to surrender as darkness was falling. Burgoyne withdrew his force, leaving the sick and wounded on the field.
On October 8, during the night, Burgoyne ordered a retreat and began to move northward. They eventually made their way back to the fortified British camp at Saratoga, above the Hudson River. The darkness had saved Burgoyne from a complete defeat.
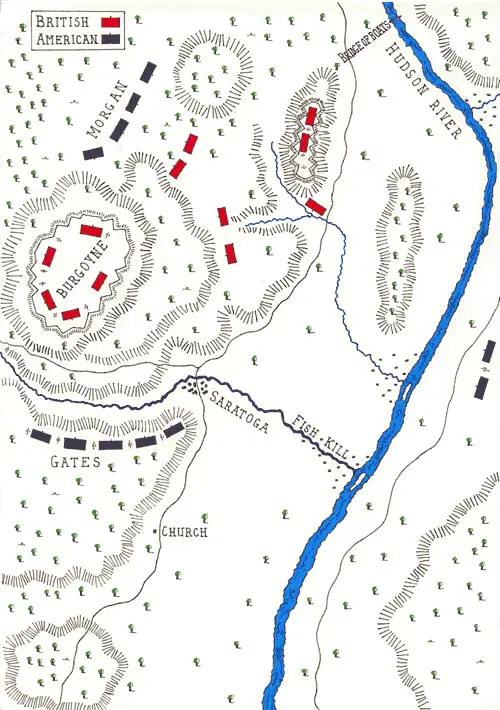
Click to Enlarge
On October 17, Burgoyne was forced to formally surrender to Gates accepted Burgoyne's surrender of the British army. The formalized surrender was known as the Saratoga Articles of Convention. Gates agreed if the British laid down their arms and returned to England, they would be able to keep their colors and go home as free men. Burgoyne was allowed to march out of camp "with the Honors of War", and began their march west. However, when they reached New England, Gates' terms were not honored by the Continental Congress. Instead, the British soldiers were sent to prison camps.
The effect of the American victory at Saratoga was enormous. Gates became known as the "Hero of Saratoga." The victory also gave the fledgling country some much needed momentum. Not long afterwards, France learned of the American victory and prompted them to recognize the American colonies as an independent nation. They then declared war on England. France officially joined the war and soon after, Spain did the same. With both France and Spain joining war, the American effort was galvanized. The British loss also further weakened the current British government under Lord North. The victory at Bemis Heights and subsequent surrender at Saratoga is generally looked upon as a major turning point in the Revolutionary War.
British Regiments:
The senior officers were Major General Phillips, Baron Riedesel, Brigadier Simon Fraser and Brigadier Hamilton.
Major Lord Balcarres commanded the light companies of the 9th, 20th, 21st, 24th, 29th, 31st, 47th, 53rd and 62nd Foot as a single unit.
Major Acland commanded the grenadier companies of the same regiments.
The battalion companies of the 9th, 20t, 21st, 24th, 29th, 31st, 47th, 53rd and 62nd Foot.
Breyman’s Jägers:
Riedesel’s Regiment
Specht’s Regiment
Rhetz’s Regiment
Hesse Hanau Infantry
Captain Pausch’s Hesse Hanau Company of artillery
Indians and Canadians:
9th Foot: later the Norfolk Regiment and now the Royal Anglian Regiment.
20th Foot: later the Lancashire Fusiliers and now the Royal Regiment of Fusiliers.
21st, the Royal Scots Fusiliers; now the Royal Highland Fusiliers.
24th Foot: later the South Wales Borderers and now the Royal Regiment of Wales.
29th Foot: later the Worcestershire Regiment and now the Worcestershire and Sherwood Foresters Regiment.
31st Foot: later the East Surrey Regiment, then the Queen’s Regiment and now the Princess of Wales’s Royal Regiment.47th Foot: later the North Lancashire Regiment, the Loyals, and now the Queen’s Lancashire Regiment.
53rd Foot: later the King’s Shropshire Light Infantry and now the Light Infantry.
62nd Foot: later the Wiltshire Regiment, then the Duke of Edinburgh’s Royal Regiment and now the Royal Gloucestershire, Berkshire and Wiltshire Regiment.
The American Army:
Right Wing:
Under the personal command of General Horatio Gates:
Brigadier Glover’s Continental Brigade
Colonel Nixon’s Continental Regiment
Brigadier Paterson’s Continental Brigade
Centre:
Brigadier Learned’s Continental Brigade
Bailey’s Massachusetts Regiment
Jackson’s Massachusetts Regiment
Wesson’s Massachusetts Regiment
Livingston’s New York Regiment
Left Wing:
Commanded by Major General Benedict Arnold
Brigadier Poor’s Brigade
Cilley’s 1st New Hampshire Regiment
Hale’s 2nd New Hampshire Regiment
Scammell’s 3rd New Hampshire Regiment
Van Cortlandt’s New York Regiment
Livingston’s New York Regiment
Connecticut Militia
Morgan’s Riflemen
Dearborn’s Light Infantry